Objective
To learn to Adobe Photoshop production techniques by example.
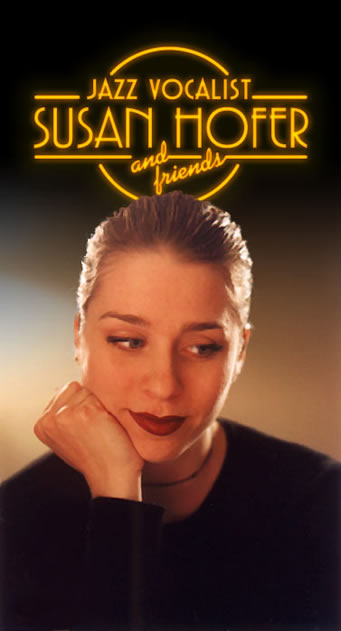
To learn extracting and retouching techniques in Adobe
Photoshop by recreating the art below.
Discussion
Type and logos are usually vector elements that are combined with
pixels elements in a layout program. In special circumstances,
a logo may need to be merged with a photograph. In such cases, we can make use of Photoshop's "smart object" feature to retain the integrity and scalability of the vector art. In addition, hair and fur are particularly difficult to cut out by hand. Fortunately, Photoshop's extract filter works wonders and does most of the work for you.
Procedure
prepping the file
- download starter files
- open "susan.psd" in
Photoshsop
- dupe "Background" layer; rename "retouched"
- dupe layer, rename: "extract"
- filter > noise > dust & scratches
- filter > sharpen > unsharp mask (radius=1, threshold=0,
amount=?)
- image > adjust > variations
- dupe "retouched" layer; rename "extract"
- image > canvas size: height=700 pixels, anchor=bottom
extracting
- go to "extract" layer, hide others (option-click eye)
- filter > extract
- edge highlighter tool (use smart highlighting): highlight the
edge of the image (hold OPTION to erase highlighting)
- fill tool: fill the center of the image (this protects the
image)
- choose preview, choose gray matte
- use the cleanup tool to remove extra background (hold OPTION
to add image) (choose [ or ] to change brush size)
making the graduated background
- choose default colors; show all layers
- new layer "black", position layer below "extract"
- gradient tool (linear, foreground to transparent)
- draw gradient (use SHIFT to constrain)
making the neon effect
- reveal only "extract" layer
- place "susan logo.ai", adjust size & position, RETURN to
accept
- position "logo" layer below "extract"; reveal all layers
- make foreground color yellow, background color orange
- add layer style "inner glow" (color: foreground to
background) (see PDF settings)
- add layer style "outer glow" (color: orange) (see
PDF settings)
- add layer style "drop shadow" (color: yellow) (see
PDF settings)
retouching
- go to "extract" layer
- layer > add adjustment layer (levels): increase contrast
- magic wand eyes (tolerance=16); select > modify > feather
= 1
- layer > add adjustment layer (levels): make midtones lighter
(middle
triangle)
- retouch flaws (spot healing brush tool or clone stamp tool)
grading
- add your name and the exercise number on the PSD file
- layer > flatten image; image > mode > CMYK
- file > save as (format=JPEG; quality=10)
- open the JPEG in Photoshop and print a proof for grading
- file your graded proof in your Process Book for individual review
