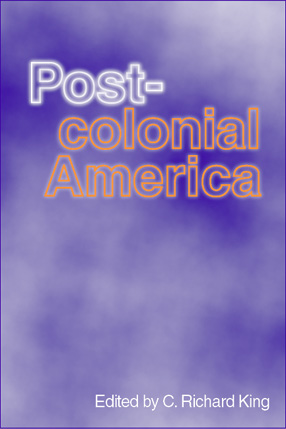
Objective
To learn two-color Photoshop production techniques by example.
To learn Photoshop filter effects and channel operations techniques
by recreating the book cover below.
Discussion
We know Photoshop can create CMYK and RGB images. But few people
know that Photoshop can also produce spot color channels which can be made in to plate-ready color separations. The key to producing
spot-color art in Photoshop lies in the channels, where each channel can
represent one Pantone color. The result is an EPS file that InDesign can
see and print as separations.
Procedure
preparing the art
- download starter files
- open "post.ai" in Illustrator; inspect layers
- file > export as "post.psd" (grayscale, write
layers, 300 DPI)
- open "post.psd" in Photoshop
- choose default colors
- new layer "sky": filter >
render > clouds; cmd+F to render again; cmd+opt+F to render
contrastier clouds
- move "sky" layer to bottom
- edit > free transform (cmd-T), blow up and adjust positioning
so that dark areas are behind the word "Post"
- make file size smaller: select > all (cmd-A), image >
crop
- new layer "box": fill layer with white; move to bottom
making the blue plate
- make type white on all type layers (cmd+shift+DELETE)
- dupe "colonial" layer; filter > blur > gaussian
blur (3)
- dupe "post" layer; filter > blur > gaussian
blur (3); dupe "post copy" layer, merge down (cmd+E)
- new layer "blue plate", move to top; opt+merge visible
(flyout menu); hide other layers (this takes a snap shot of your
screen without
flattening the image)
- go to channels; dupe "gray" channel; double-click
"gray copy" channel, make spot channel (flyout menu),
change color to PMS 072
- return to layers, hide "blue plate" layer, reveal "box"
layer (note no art layers are visible, only art on spot channel
is visible)
making the orange plate
- dupe "colonial" layer, rename "orange plate",
move to top, make type black (opt+shift+DELETE)
- go to channels, dupe "gray" channel, double-click
"gray copy" channel, make spot channel, change color
to PMS 1495
- return to layers, hide "orange plate" layer, reveal "box" layer
(note no art layers are visible, only art on spot channels are
visible)
- save; flatten; file > save as "post.eps" (photoshop
DCS format, preview=TIFF, DCS=single file with color composite,
encoding=binary)
- file > save for web: preset=JPEG high, image size=800px wide
- publish JPEG as a link from your projects page
printing from InDesign
- launch InDesign
- file > new: 6x9 inches, bleed=1p; add slug=3p (bottom)
- file > place "post.eps"
- add your name to bottom of file as a "slug" (fill=registration)
- preview printing plates (window > output preview)
- print as separations to a b&w printer (with bleeds and slug)
- submit color-separated paper proofs with your name on it
for grading
- file graded proof in your 3-ring binder for individual
review
