
Objective
To learn photo manipulation and painting techniques by example. To learn Adobe Photoshop filters, masks, brush tool, and adjustment layers by recreating a digital painting.
Discussion
Concept artists create visuals for animation studios, film and video production companies, gaming companies, advertising agencies, graphic design firms, print publications, web design firms, and even architecture firms. Concept art is not considered a 'complete' illustration. Instead, it's goal is to assist a production team in visualizing the look and feel of their creative project.
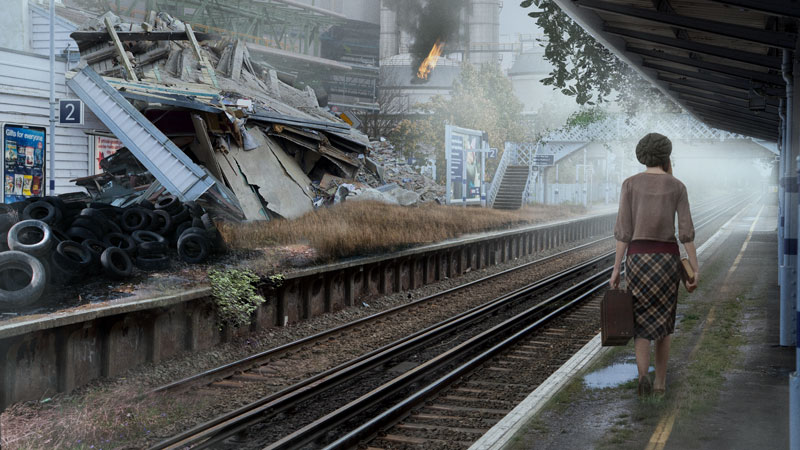
For this exercise, we will use a technique known as 'photo bashing,' a type of digital illustration in which pieces of photos are manipulated together to create a final composition. The concept artist may choose to digitally paint over the manipulated photo. This is a popular technique utilized by concept artists who need to work quickly and efficiently.
Exercise adapted from 'Build Your Own Dystopia Concept' published in 'Fantasy Art Genius Guild.'
Note: although this exercise can be completed using only a computer mouse; a tablet or ipad + astropad will make the process easier and more enjoyable.
Procedure
prepare the plate
- download starter files
- launch Photoshop
- open 'plate.jpg'
- save as 'concept_art.psd'
- practice Adobe navigation keyboard shortcuts: space = hand; space+cmd = zoom in; space+cmd+opt = zoom out; cmd+zero = fit in window
- edit > color settings > RGB: Adobe RGB (1998)
- rename layer 'plate'
- new group: 'photobash'
- move 'plate' layer to 'photobash' group
removing the background
- using the magnetic lasso tool, select sky
- select > inverse > create mask (icon in layers panel)
- refine mask
- save
adding new background elements
- open 'scaffolding.jpg'
- image > adjust > color match 'concept_art' > neutralize > adjust sliders
- move image into 'concept_art,' rename layer 'scaffolding', move to bottom of layer stack
- move 'scaffolding' layer to the left, resize, increase perspective to match plate layer (edit > transform > distort)
- open 'towers.jpg'
- image > adjust > color match 'concept_art' > neutralize > adjust sliders
- move image into 'concept_art,' rename layer 'towers', move to bottom of layer stack
- reposition and resize 'towers' layer
- mask right side of 'scaffolding' layer
adding foreground elements
- open 'tires.jpg,' match color
- move into 'concept_art,' rename layer 'tires'
- move top of layer stack, reposition, resize and mask (hint: use soft and textured brushes with low opacity and flow for the grassy area)
- open 'grass_right.jpg,' match color
- select strip of grass with lasso tool
- move into 'concept_art,' rename layer 'grass_right'
- increase perspective of 'grass_right' to match plate layer (edit > transform > distort)
- mask 'grass_right'
- open 'grass_left.jpg,' repeat
- move 'grass_left' under 'tires'
station destruction
- select left side of roof, copy onto new layer (cmd+shift+C, cmd+V), rename layer 'roof'
- rotate and distort
- open 'wreckage.jpg,' color match
- move into 'concept_art,' rename layer 'wreckage', restack below 'grass_left' layer
- edit > transform > flip horizontal
- resize, mask
- add additional wreckage if needed using 'wreckage_filler.jpg' (optional)
- soften 'grass_left' layer mask to incorporate the wreckage with foreground
- to remove dog: select dog with lasso tool, edit > fill > content aware (hint: if the fill doesn't match the rest of the wreckage, try a different selection)
- remove right part of gas station roof by masking 'plate' layer
adding trees
- open 'trees_1'
- select trees: select > color range > + eyedropper, sample sky colors
- select > inverse
- select > modify > contract: 1px
- move selection into 'concept_art.psd,' rename layer: 'trees'
- resize, position, restack under 'wreckage' layer
- mask unneeded elements
adding the figure
- open 'woman.jpg,' match color
- select girl with magnetic lasso tool, refine with mask
- use mask to create selection (cmd+click on mask thumbnail)
- move into 'concept_art.psd,' hint: image thumbnail must be selected
- resize, reposition
- save
change the aspect ratio
- file > save as 'concept_art_cropped.psd
- crop: 16x9
Create flames
- new layer: flames
- create a short line segment with pen tool
- filter > render > flames: adjust settings
paint
- new layer group: 'paint'
- using the brushes included in the starter files, paint over the building and landscape. add holes in the building under flames and populate the landscape with over-grown vegetation. create new layers as needed. use elements from 'additional_textures' folder.
- add fog. mask and erase as needed.
- add more trees and vegetation from 'additional_textures' folder (optional)
hint: move girl to top of layer stack in 'paint' layer group
adding noise
- new layer group 'noise', move above 'paint' group, new layer 'noise,' move above 'paint'
- edit > fill > contents: 50% gray
- filter > convert for smart filters
- filter > noise > add noise: gaussian, amount = 10
- filter > noise > median = 1
- change 'noise' layer mode to 'overlay' (gray becomes invisible)
- decrease opacity of 'noise' layer
- save
harmonize color
- new layer: 'color'
- fill with light blue
- layer mode: multiply
- reduce opacity
- save
grading
- add your name and the exercise number on the PSD file
- file > save as (format = JPEG; quality = 6)
- open the JPEG in Photoshop and print a proof for grading
- file your graded proof in your Process Book for individual review