Objective
To learn advanced Photoshop texturing and masking techniques by recreating the art below (1-sponge, 2-watercolor, 3-chalk):
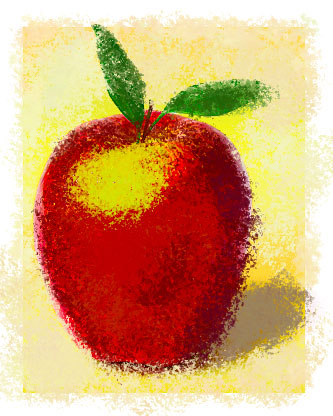 1
1
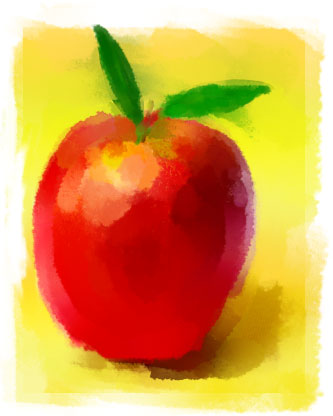 2
2
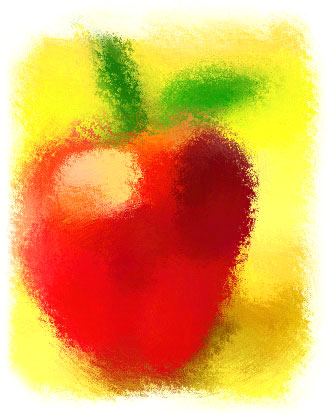 3
3
Discussion
Although Photoshop comes installed with a wide array of brushes, one can download many more for free from the Internet. If you still can't find what you need, then you can always make your own. In this exercise, we'll explore all of these options.
Note: Many of the techniques used in this exercise are described in more detail in the Photoshop WOW Book.
Procedure
prepping for the exercise
- download starter files
- download ink splatter brushes from www.brushking.eu
- file > new "test.psd": 1000x800px, RGB
- new layer
- explore Photoshop brushes
- window > brush presets: load "ink_splatter... .abr" (flyout)
- explore downloaded brushes
- window > brush presets: reset brushes (flyout)
making a custom brush
- open "splatter.jpg" in Photoshop (note image is grayscale)
- select all (cmd+A)
- edit > define brush preset: "splatter"
- close window
- window > "test.psd"; choose brush tool
- window > brush presets: choose "splatter", test brush
- choose preset: "scattered maple leaves"
- window > brush (F5): lock current settings
- window > brush presets: choose "splatter", test brush, adjust
- new brush preset "scattered splatter"
- flyout > save brushes "ink.abr"
- window > brush (F5): reset all locked settings (flyout)
using wow brush presets
- open "apple.psd", save as "apple-sponge-brush.psd"
- brush tool: flyout > load tool presets "Wow Art Media Brushes.tpl" (options bar)
- choose preset "wow-BT-sponge-medium"
- new layer "apple"
- eye dropper (I): sample bg color
- brush tool (B): paint (paint with larger brush, then scale down)
- add new layers as needed: "bg", "leaves", etc
using wow pattern brush presets
- open "apple.psd", save as "apple-watercolor-pattern.psd"
- select all (cmd+A)
- edit > define pattern: "apple"
- pattern stamp tool: flyout > load tool presets "Wow Pattern Stamp Brushes.tpl" (options bar)
- load pattern "apple" (options bar)
- choose preset "wow-PS-watercolor-medium"
- new layer
- paint with larger brush, then scale down
using wow art history brush presets
- open "apple.psd", save as "apple-chalk-history.psd"
- window > history: new snapshot: from merged layers "apple" (flyout)
- art history brush tool: flyout > load tool presets "Wow Art History Brushes.tpl" (options bar)
- choose preset "wow-AH-chalk-medium"
- new layer
- set source for the history brush: "apple"
- paint with a small brush
grading
- submit b&w laser proofs with your
name on it for grading
- file graded proof in your Process Book for individual review
- publish a JPEGs linked from your Process Page (no wider than 800px)
