Graphic Design Exercises
Photoshop: Animated Type
(Archived from 2019)
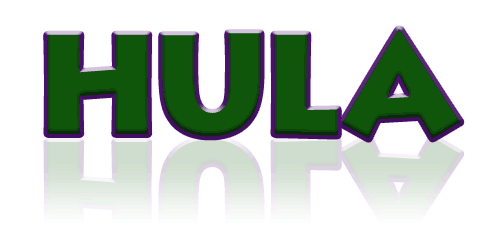
Objective
To be introduced to Photoshop's animation techniques by recreating the
following GIF animation:
Procedure
styling the type
- download starter file
- turn on "Lithos" using Font Agent Pro
- open "hula.psd" in Photoshop
- practice Adobe navigation keyboard shortcuts: space=hand;
space+cmd=zoom in; space+cmd+opt=zoom out; cmd+zero=fit in
window
- choose default colors (d)
- add layer style "color overlay" (color=green)
- add layer styel "stroke" (size=4, color=purple)
- add layer style "bevel & emboss" (style=stroke
emboss, technique=chisel hard, direction=down, size=5, soften=3)
- add layer style "inner shadow" (distance=3)
- duplicate "hula" layer; go to "hula copy" layer
- edit > transform > flip vertical; adjust position
- layer opacity=20%
- new layer "white"
- set foreground color=white
- gradient tool: paint gradient to fade reflection (foreground to transparent)
- save
animating the type
- go to "hula" layer
- window > animation
- add new frame (frame 2 is selected)
- layer > type > warp text (style=flag, bend=20% horizontal)
- repeat with "hula copy" layer (use negative number)
- tween (layers=all layers, tween with=previous frame,
frames to add=5)
- play 7 frames
- select frame 7, add new frame (frame 8 is selected)
- layer > type > warp text (reverse bend percentage on
each layer)
- tween (frames
to add=11)
- play 19 frames
- select frame 19
- tween (tween with=first frame, frames
to add=5)
- play 24 frames
- select all frames (flyout)
- change timing to 0.1 sec
- optimize animation (flyout menu)
- file > save for web "hula.gif" (setting=GIF 64 no dither, images
only)
- drag "hula.gif" into a browser
- publish GIF as a link from your projects page
BACK TO TOP
Last updated:
5/7/21
