Objective
To learn Photoshop/Illustrator production techniques by recreating the following poster:
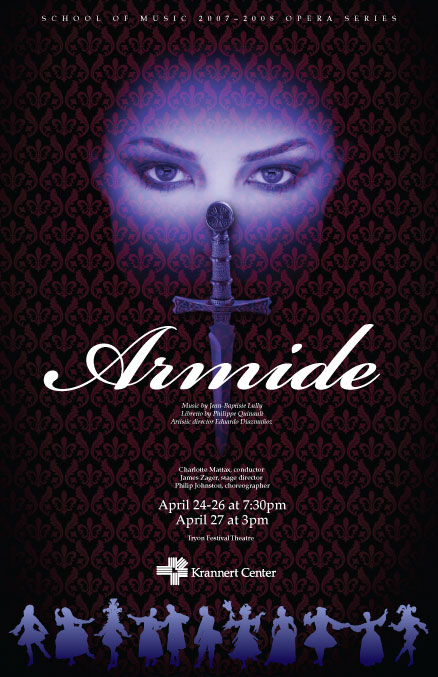
Discussion
A photo montage is similar to a collage in the sense that both are a composite of several images. More often than not, a collage looks like separate pieces that have been combined while a montage looks like one integrated piece with multiple elements. A collage may make use of non-photographic material (i.e. paper, leaves, etc.) while a montage tries to blend all its elements into one seamless photograph.
When working in Photoshop, it's important to stay in RGB mode as long as possible. This will retain your color integrity and give you more options when using filters and/or layer modes. Your archival layered PSD file should always be in RGB. Convert to CMYK just before you are ready to flatten the image for printing.
Procedure
making a rough layout in Illustrator
- download starter files
- turn on Bickham Script (using Font Agent Pro)
- launch Illustrator, file > new "armide.ai" (RGB, tabloid, portrait)
- file > place "dancers.jpg"
- live trace: detailed illustration, ignore white; expand; ungroup
- rearrange, edit, scale; fill with gradient
- new layer "type"; copy and paste text from "armide.txt": Palatino 12pt or 24pt; title is Bickham Script (scale visually)
- copy and paste logo from "kcpaLogo.ai"
- new layer "pattern"
- copy and paste art from "pattern.ai"
- window > swatches: drag art into floating panel
- delete original pattern art
- draw rectangle (11x17in), fill=pattern
- scale tool: make pattern smaller (shift+~)
- file > export "armide.psd" (RGB, retain layers, 150ppi)
creating the photo montage in Photoshop
- open "armide.psd" in photoshop
- new layer "bg", fill with black (opt+DELETE); restack to bottom
- pattern layer: layer mode=lighten, opacity=33%
- type layer: make type white (cmd+shift DELETE)
- file > place "face.jpg"; retack below "pattern" layer
- add layer mask, paint out edges to reveal only eyes
- new adjustment layer (hue/saturation): colorize=yes, make blue
- file > place "dagger.png"
- add layer style: drop shadow; adjust
- add layer mask to "dagger" layer: make dagger semi-transparent
- add layer mask to "pattern" layer: reveal eyes
- new layer "edges": darken edges
- save; save as "armide-CMYK.psd"
- hide "type" layer
- image > mode > CMYK
- save
finishing the poster in Illustrator
- open "armide.ai"
- file > place "armide-CMYK.psd"
- make type white
- adjust layout
grading
- submit color laser proof (11x17) with your name on it for grading
- file graded proof in your Process Book for individual review
- publish a JPEG linked from your Process Page (no wider than 800px)
