Objective
To be introduced to illustration styles and the power of interpretation.
To abstract and reduce details to their essential elements. To
utilize digital tools for perspective drawing.
Discussion
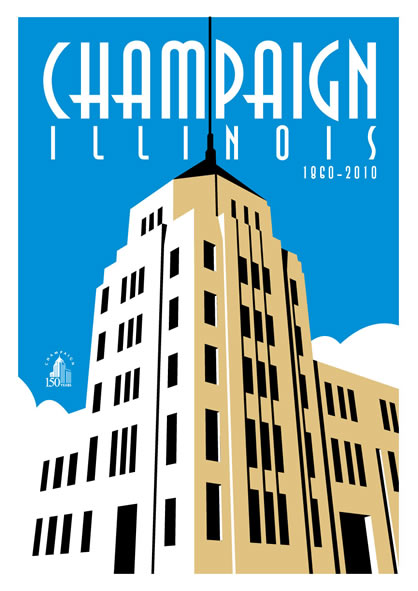
Linear perspective is a cultural convention (not all art in all cultures make use of linear perspective). The rules of perspective drawing requires that a horizon line exists with at least one vanishing point (where perspective lines converge). In this illustration, we will utilize 3-point perspective in order to enhance the height of the building.
Once the art is finished, we will go one step further and prepare the color separations for silkscreen printing. Screen printing requires solid flat colors (no gradients or tints). The registration is not exact, so overprinting colors is recommended whenever possible (the ink is very opaque).
Note: When creating a design in Adobe Illustrator for screen printing, it is important to maintain a clean and organized layer stack.
Procedure
prepping the reference image in Photoshop
- download starter files
- download Ai perspective grid reference
- turn on ITC Anna (using Font Agent Pro)
- open "city.jpg" in Photoshop
- crop tool (hotkey C): crop and straighten image
- image > canvas size: 13x18 inches
- edit > transform > distort : increase perspective
- save as “city.psd”
setting up the perspective grid in Illustrator
- launch Illustrator: file > new: "city.ai" (12x17 inches)
- file > place: " city.psd" (as template)
- rename “layer 1” as "guilds"
- line tool, stroke: hot pink
- draw two horizontal perspective guilds on each side of building; establishing vanishing points and ground plane
- view > perspective grid > three point perspective > 3P normal view
- perspective tool (shift P)
- align ground level line with the bottom corner of building
- drag vertical vanishing point north of ground level line
- drag vertical grid extent control north
(hint: it is hidden behind the grid cell size control point)
- adjust horizontal level and vanishing points, use pink lines as a guild
- move vertical vanishing point north until guild aligns with building
(hint: hold down shift key)
- view > perspective grid > save grid as preset > "city"
- hide and lock “guilds” layer
drawing the windows
- view > perspective grid > snap to grid
- new layer: “windows”
- select left horizontal plane on perspective widget
- draw windows on left side of building, fill: black, stroke: none
- reduce opacity of windows
- create vertical rectangles to 'mask' windows
- return window opacity to 100%
- trim windows with pathfinder tool, 'divide'
- repeat on right side of building
drawing the building
- new layer: "building-tan"
- select right plane on perspective widget
- draw right side of building, fill: tan, stroke: none
- new layer: "building-white"
- select left plane on widget
- draw left side of building, fill: white, stroke: none
- new layer: "building-cutaway"
- view > perspective grid > hide grid
- pen tool: draw the top center cutaway of building
- new layer: "building-top"
- pen tool: draw roof and spire
drawing the shadows and highlights
- new layer: "shadows" & "highlights"
- view > perspective grid > show grid
- draw shadows; stroke: none, fill: black
(hint: choose left grid for right side of building)
- draw highlights; stroke: none, fill: white
- save as “city_v2.ai”
finishing the building
- delete “template” and “guilds” layers
- view > perspective grid > hide grid
- view > smart guilds > off
- new layer “sky”: draw blue box
- new layer “clouds”: draw clouds
- new layer “type”: add type (ITC Anna)
- new layer “150”: copy & paste logo from “150.ai”
- new layer “frame”: add white boxes to cover up excess art
making the color separations
- merge art into 3 layers (one for each ink)
- use pathfinder to unite and trim art (as needed)
- tip: merge art with object > compound path > make (as needed)
- type > create outlines
- save, save as "city2-separated.pdf"
making the color separations (alternate method)
- download Acobat 9.PPD (if needed)
- open city2.ai", save as "city3.ai"
- convert all colors to spot colors; tag all objects as spot colors
- window > pathfinder: trap (flyout menu) (only colors that butt)
- file > print:
• general: printer = adobe postscript;
PPD = adobe PDF; media = custom;
options = do not scale
• marks & bleeds: all printer's marks = yes
• output: mode= separation, colors = ??
- open "city3.ps" with Acrobat Professional
- save as "city3-separated.pdf"
grading
- submit color-separated laser proofs with your name on it for grading
- file graded proof in your Process Book for individual review
- publish a JPEG linked from your Process Page (no wider than 800px)
