Objective
To learn Photoshop and Illustrator production techniques by example.
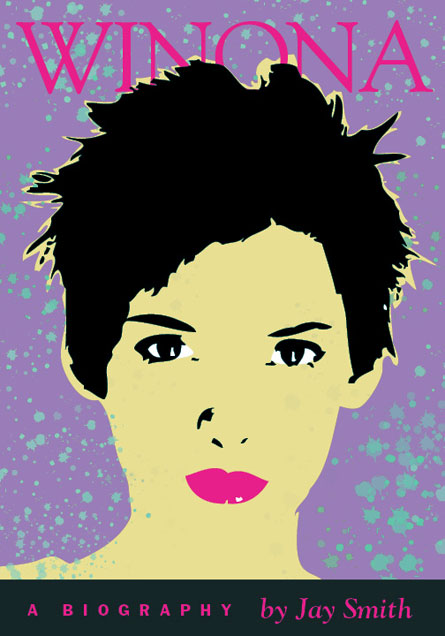
To experiment with techniques of manipulating scans for creative
effects by recreating the book cover below.
Discussion
Going from vector to raster is easy: any vector image can be resterized
to any file size. Going from raster to vector is harder. Most scanned
images don't translate well into outlines. The trick is to know
what will vectorize well (i.e. organic shapes with few colors).
In this exercise, we will manipulate a photograph to the point where
it will translate well as vector.
Procedure
Manipulating the scan in Photoshop
- download starter files
- open "winona.psd" in Photoshop
- practice Adobe navigation shortcuts (space=hand, space+cmd=zoom in, space+cmd+opt= zoom out; cmd zero=fit in window)
- reduce moire pattern: filter > blur > gaussian blur (minimum
amount)
- dupe layer, rename "hair", hide previous layer (for
safe keeping)
- image > adjust > levels: make hair solid black
- magic wand, select hair
- select > inverse, fill with white (opt+delete)
- default foreground and background
- deselect (cmd+D)
- touch up art by painting with white (if needed)
- repeat for "nose", "mouth",
"eyes", "face"
- use lasso tool or eye dropper tool to select features
- select "face" layer: image > adjustments > invert (cmd+I)
- rename "face" layer as "bg"; move "bg" layer to bottom
- composite all layers: layer mode=multiply (except for "bg" layer)
- retouch any art that is touching (watch the gap around the hair)
- save, close
Creating the art in Illustrator
- launch Illustrator
- file > new "winona.ai" (letter, portrait, CMYK)
- file > place "winona.psd"
- toggle outline/preview (cmd+Y)
- click "image trace", show tracing options dialog (adjust presets, threshold, paths, etc); ignore white=yes
- expand (click button in options bar)
- toggle outline/preview (cmd+Y)
- object > ungroup (cmd+shift+G)
- add new CMYK spot colors (include rich black: 100K+50C) (tip: spot colors show up in InDesign)
- new layer "bg"
- move bg object to "bg" layer (see help)
- repeat with lips
- new layer "eyes": draw white shapes
- new layer "type": add "WINONA" (Goudy Old Style)
- window > swatches: select all unused, delete (flyout)
- extend art to accommodate type
Painting with symbols
- new layer "texture"
- window > symbol libraries > artistic textures: splatter
- paint with symbol sprayer tool ([ or ] to change size, OPT to erase)
- adjust symbols with other symbol tools
- object > expand
- change splatter color, adjust transparency
- save
Printing with InDesign
- launch InDesign
- file > new: 7x10 inches, portrait; margins=0; bleed=1p, bottom
slug=3p (more options)
- file > place "winona.ai" (cmd+D)
- scale/crop for bleed
- new layer "box": draw black box (use rich black)
- new layer "type": add type "A BIOGRAPHY by Jay Smith"
(ITC Franklin Gothic Heavy & Goudy Bold Italic)
- window > output > separation preview: review each printing plate
- window > swatches: change spot colors to process
- add slug at bottom with your name (color=registration)
- print composite color (setup: page position=centered; marks & bleed: crop marks=yes, include slug area)
Grading
- submit a color proof with your name on it for grading
- file your graded proof in your Process Book for individual review
