Objective
To learn Illustrator and InDesign production techniques by creating
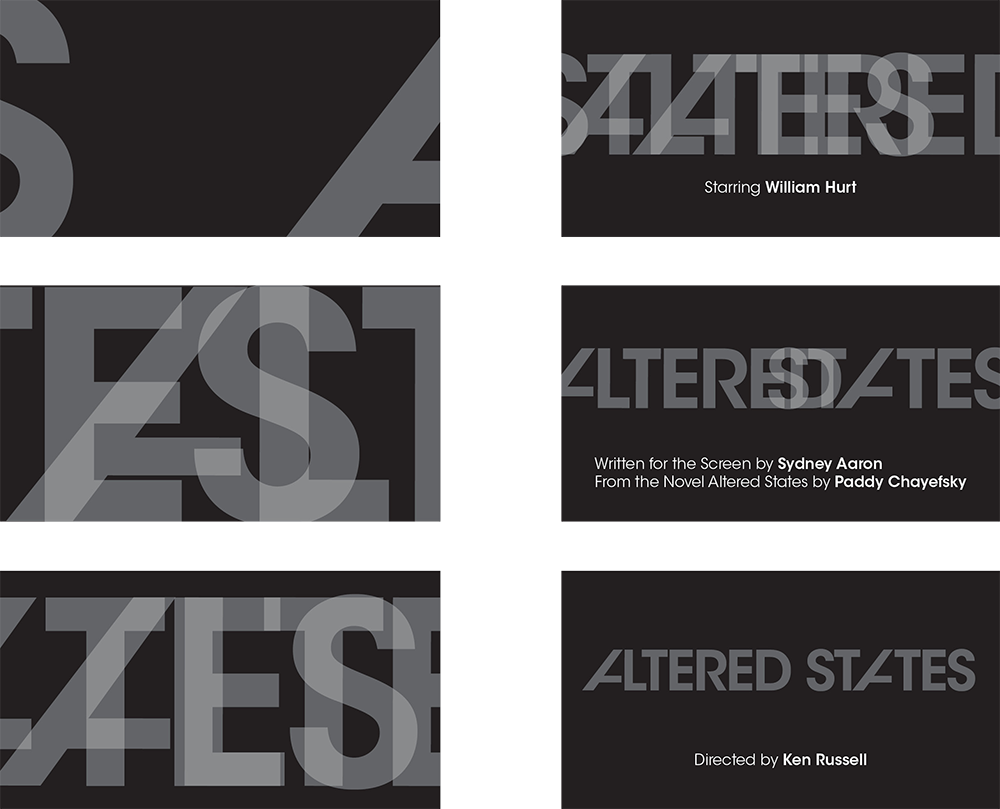
a concept storyboard inspired by Richard Greenberg's title sequence design for the 1980 film Altered States (click image below to enlarge).
Discussion
Illustrator and InDesign are well integrated Adobe applications. In this exercise we will utlize the best of both apps to produce a concept storyboard.
Illustrator's multiple artboards allows us to see multiple pages in various arrangement easily. Each art board becomes a cropped image when imported into other apps. This function is ideal for creating storyboard art.
InDesign is designed to efficiently combine art from multiple sources into one layout (or one multi-page publication). We will use InDesign to arrange the storyboard art into a presentation format.
Procedure
Prepping the final grid in InDesign
- downloaded starter files
- examine downloaded files
- launch InDesign
- file > new: letter, landscape, margins=0
- save as "altered.indd"
- draw box: w=1.85 in, h=1.0 in, stroke=1pt (opt+click page)
- scale box up to approx 1/6 of the page
- align and distribute into 2 columns and 3 rows
- refine layout: group, scale, position
- add title (9pt ITC Avant Garde Book or Bold)
- note width and height of boxes
- save
Creating the storyboard in Illustrator
- launch Illustrator
- file > new: profile=print, number of artboards=6, arrange=by column, spacing=???, w=???, h=???
- save as "altered.ai"
- rename "layer1" as "bg", add new layers "art", "type"
- draw black box on "bg" layer, dupe 5x, lock
- go to "type layer"
- file > place "altered.txt" (position near frame 6)
- spec font: ITC Avant Garde Book, add Bold as needed, fill=white, size=???
- cut/paste text into logical text objects (point type)
- move text objects to artboards per example
Creating the title art in Illustrator
- spec font for title: ITC Avant Garde Demi
- move title text to "art" layer, lock others
- scale up, tighten tracking (opt+LEFT or RIGHT arrows)
- copy type object (opt+drag)
- type > convert to outlines (cmd+shift+O)
- object > ungroup (cmd+shift+G)
- slant tool: modify "A"
- direct select tool: delete lines, join anchors (cmd+J); refine
- duplicate modified "A" and reposition
- group each word (cmd+G)
- window > transparency: opacity=25%
- position art on each art board as per sample
- save
Finishing the storyboard
- open "altered.indd" in InDesign
- file > place "altered.ai" (show import options=yes)
- object > fitting > fill frame proportionally
- window > links: update links as needed
Grading
- save
- file > adobe PDF export: high quality print: "altered-large.pdf"
- file > adobe PDF export: smallest file size: "altered.pdf"
- publish "altered.pdf" as a link from your Process Page
- submit b&w laser with your name and exercise number for grading
- file graded proof in your Process Book for individual review
