Objective
To be introduced to Photoshop's selection tools, masking options, and adjustment layers. To use Indesign as a layout tool. To recreate the
above poster design.
Discussion
Adobe Photoshop contains powerful photo manipulation tools. When used skillfully, the designer can create dynamic images which would be impossible with a camera alone. Indesign can be used to add type and prepare the design for print. Posters continue to be a popular print medium for commercial and educational purposes.
Procedure
preparing the file
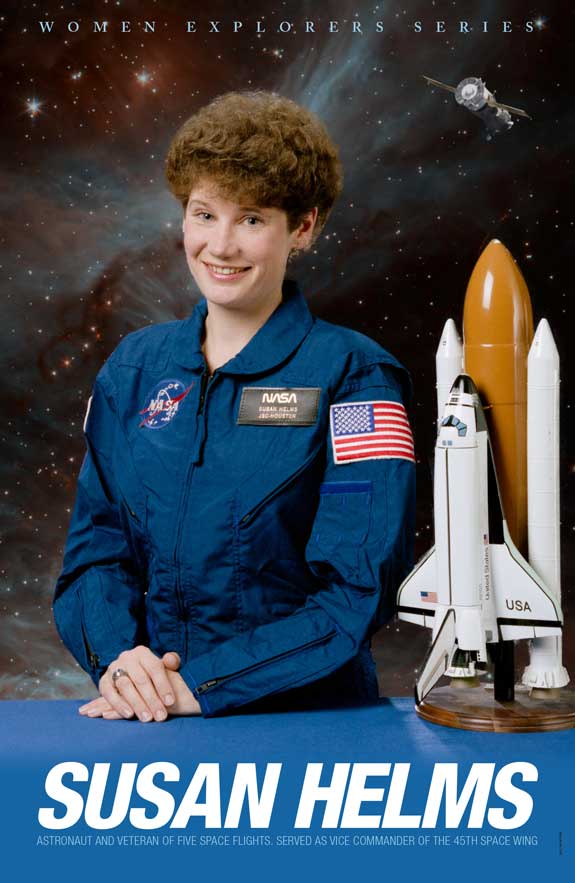
- download starter file, open susan_helms.png in Photoshop
- image > image size; note image size and resolution
- practice Adobe navigation keyboard shortcuts: space = hand;
space + cmd = zoom in; space + cmd + opt = zoom out; cmd + zero
= fit in window
- rename layer "susan"
- save as "susan_helms.psd
adding the background layer
- open space.jpg
- copy and paste into susan_helms.psd (cmd + A, cmd + C, cmd + V)
- rename layer "space"
- re-stack layer under "helms" layer
- layer adjustment > hue/saturation: lightness -25, saturation +29
adding blue background
- new layer: rename "blue"
- sample blue from table with eyedropper tool (I)
- fill "blue" layer with foreground color (opt+delete)
- re-stack "blue" layer to top
- decrease layer fill: 40%
- create layer mask on "blue" layer (mask button at bottom of layers panel)
- gradient tool: black, white
- draw gradient (draw a line half way down the table starting at the bottom of susan's hand)
- return fill to 100%
adding international space station
- open iss.jpg in photoshop
- copy and paste image into "susan_helms.psd"
- rename layer "iss"
- re-stack layer to top
- magic wand tool: tolerance 22
- select black background on "iss" layer
- select > modify > expand 2px
- select > inverse (cmd+shift+I)
- add layer mask (mask button at bottom of layers panel)
- reposition, re-size (cmd T)
- blur > gaussian blur > 3px (make sure image thumbnail is selected and not the mask thumbnail in layers panel)
- clean up mask if needed
- adjustment layer > levels
- attach levels adjustment to "iss" layer (hover between "iss" and level adjustment layer, click when a square and arrow become visible)
- output levels: 0,185
- save
finishing layout in Adobe Indesign
- open "nasa.indd"
- rectangle frame tool, double click on art board: W 24.5in, H 36.5in
- reposition (note bleed)
- place "susan_helms.psd" (cmd D)
- resize image
- new layer: "type", stack above "art"
- draw guilds for margins
- place type: "nasa_text" (cmd D)
- series title: adobe caslon pro semibold, 42pt, track open (opt+right arrow)
- "Susan Helms:" Helvetica Neue LT Std, 87 Heavy Condensed Oblique
- subtitle: 47 Light Condensed
- view > overprint preview
- save
- file > export "nasa.pdf" ("smallest file size" for web publishing)
grading
- print your exercise on 11x17 paper
- file your exercise in your Process Book for individual review
- publish "nasa.pdf" as a link from your Process Page
