Objective
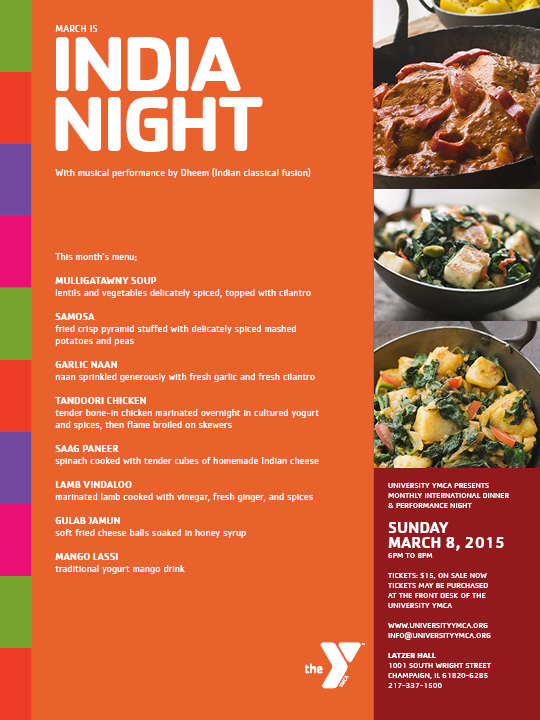
To learn advanced Photoshop and InDesign production techniques by recreating
this direct mail flyer:
Discussion
InDesign is a page layout application. This means that it has been optimized to produce publications in the fastest and most efficient way. Its superior typsetting capabilities and its ability to combine vector and pixel elements seamlessly into one document is unequaled. As a result, InDesign has become the workhorse of the graphic arts industry.
All projects (especially ones involving InDesign) should have a project folder which contains all assets. In order to avoid broken links, do not move or rename files unless absolutely necessary. When working with pixel elements, all archival assets should be saved in RGB format. If converting to CMYK for printing is required, alway duplicate the RGB file before converting to CMYK as the conversion will reduce the number of visible colors in the file.
In this exercise, we will also experience Photoshop's updated "select and mask" capabilities for silouetting pixel elements (more info).
Procedure
Silhouetting an image in Photoshop
- downloaded starter files
- examine downloaded files
- open "dancer.jpg" in Photoshop
- image > image size: resample=no, PPI=300
- rename "background" layer (double-click)
- layer > new: fill with green (opt+DELETE), move to bottom
- MAGIC WAND tool: tolerance=16, select white, add to selection (SHIFT)
- select > inverse
- select > save selection (new channel)
- select > select and mask:
• view=on layers (L)
• radius=1, smart radius=yes
• feather=1
• shift edge=-70%
• decontaminate colors=yes
• output to = new layer with layer mask
- use REFINE EDGE tool to expand (paint) or contract (paint+OPT) detection area; [ or ] to change brush size
- hide "green" layer
- save as "dancer.psd"
- delet unneeded layers
- image > mode > CMYK
- save as "dancer.jpg" (preset=10)
- open all other JPEGs: change resolution to 300PPI (resample=no); change to CMYK mode; save as new JPEG (high)
Creating a rough layout in InDesign
- install downloaded font Cachet
- launch InDesign
- file > new: number of pages=2, facing pages=no, page size=7.5x10 inches, margins=0, bleed=1p
- rename "layer1" as "guides"
- go to A-master (cmd+J: A)
- draw horizontal guide at 30p
- return to page 1 (cmd+J: 1)
- new layers: "bg", "art"
- go to "art" layer, lock others
- file > place logo, text and images
- rough out layout: scale/crop/rotate art as needed (cmd+shift drag corner handle)
- color theme tool: opt+click "indian-wedding-decor-ideas.jpg", add theme to swatches
- eye dropper tool: add additional colors as needed
- go to "bg" layer, lock others
- draw rectangular frames, fill with colors
Styling the text
- show hidden
characters (cmd+opt+I)
- cut and paste text into logical text frames (delete last ¶)
- window > styles > paragraph styles
- change "Basic Paragraph" style to 10/12
Cachet Book
- create new styles (preview=yes, apply to selection=yes):
• "text": based on=basic paragraph; hyphenation=off; character color=paper
• "text+bold": based on=text, font=Cachet Bold, case=all caps
• "text+large": based on=text+bold, 16/15
• "text+small": based on=text, 8/10
• "h1": based on=text+bold, 80/60, tracking = -70
- apply styles, check for bad line breaks
- refine layout to match PDF sample
- add your name and exercise number to mailing panel
- file > package
- file > adobe PDF presets > high quality (crop=yes, bleeds=yes)
- print duplexed with crops and bleeds centered on 8.5x11 paper
• choose color laserjet
• setup: centered
• marks and bleeds: crops=yes
• click PRINTER: 2-sided=yes
• click SHOW DETAILS
• layout: long edge binding
Grading
- submit color laser with your name and exercise number for grading
- file graded proof in your Process Book for individual review
