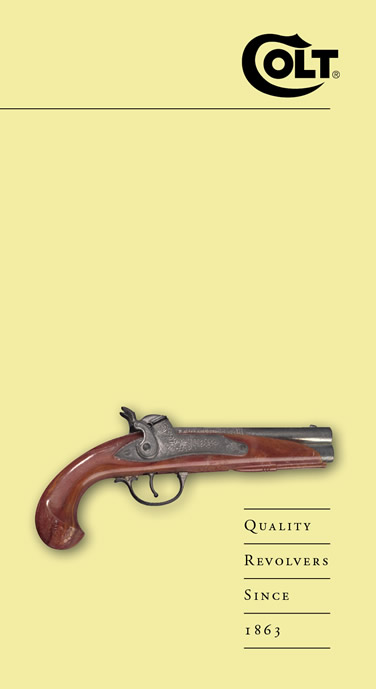
Objective
To learn advanced Photoshop and InDesign production techniques by recreating
the brochure cover
below:

Discussion
Photoshop offers many ways to cut out an object. Clipping paths can be beneficial because it is vector, editable, and can be used by other applications. The drawback to using clipping paths is that the edges are always sharp, which may look good with man-made objects, but not with some organic objects (especially those with hair). The other draw back is the lack of shadows, but this can be corrected in InDesign.
When creating layouts in InDesign, consider exploring the four systems of visual organization (symmetrical, asymmetrical, random, grid). There are benefits and drawbacks to using each type of balance, but any single layout should not utilize more than one of these systems.
Procedure
Making a clipping path in Photoshop
- download starter file
- open "guns.jpg" in Photoshop, save as "gun.psd"
- crop tool: rotate and crop gun
- image > mode > CMYK
- magic wand tool: select white background, shift+select trigger area
- select > inverse (cmd+shift+I)
- select > modify > contract: 1px
- window > paths: make work path (flyout menu); tolerance=1
- select direct select tool, then pen tool (cmd=direct select)
- delete path in upper left corner
- edit path: add/delete/move anchor points, edit handles, convert joins (opt+click or opt+click-drag)
- window > paths: save path "path 1" (flyout menu)
- save
Creating the grid layout in InDesign
- launch InDesign
- file > new: 6x11 inches, portrait, margins=0
- rename "layer 1" as "pix"
- file > place "gun.psd"
- view > display performance > high quality
- object > clipping path > options: type=Photoshop path "path 1"
- object > effects > drop shadow: distance=0p5, size=1p2
- new layer "bg", fill with solid color, restack
- file > place "colt.eps", add 1pt rule under logo
- add type "Quality Revolvers Since 1863"
- spec Adobe Garamond Pro, scale, track, adjust leading, re-position
- make small caps, add paragraph rule above
- duplicate page 1 3x, create 3 additional layouts using symmetrical, asymmetrical and random balances
Grading
- submit b&w laser proof with your name and the exercise number on it for grading
- file your graded proof in your Process Book for individual review


