Objective
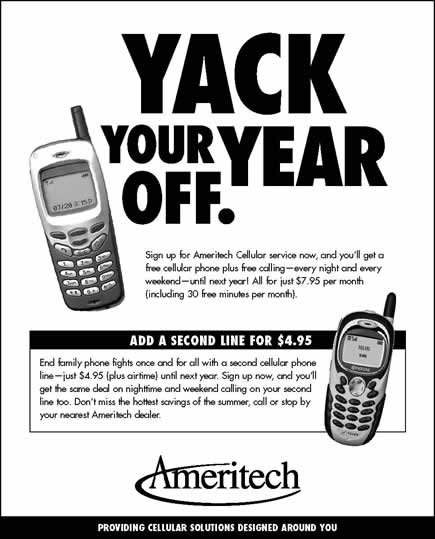
To learn advanced Photoshop and InDesign production techniques by recreating
the newspaper ad below:
Discussion
InDesign and Photoshop are now so well integrated that any transparency in Photoshop can be used in InDesign. Photoshop transparency is anti-aliased which means even vector objects in Illustrator will blend nicely behind a cut-out pixel object.
Procedure
Masking pixel elements in Photoshop
- downloaded starter files
- open JPEGs in Photoshop
- adjust resolution
- rename "background" layer as "layer 0"
- select white background (magic wand tool)
- select > modify > expand: 1px
- DELETE
- image > adjust > b&w
- image > mode > grayscale
- save as PSD
Creating a rough layout in InDesign
- launch InDesign
- file > new (more options): page size=6-7/16in x 8in, facing pages=no, margins=0, slug=3p (bottom)
- rename "layer1" as "type"
- new layers: "pix", "logo", "box", "border"
- draw border for ad (stroke=1pt)
- draw black box for boxed text (stroke=1pt)
- file > place appropriate art on each layer (unlock only current layer)
- scale/crop/rotate art as needed (cmd+shift drag corner handle)
- file > place "ameritech.doc"
- show hidden
characters (cmd+opt+I)
- replace 2 spaces with 1 space
- replace -- with em dashes
- cut and paste text into logical text frames (delete last ¶)
Styling the text
- all fonts are Futura (either Medium or Extra Bold Condensed)
- change normal style to 10/14
(window > paragraph styles)
- style tagline 10/14 (object > text frame options: vertical align center)
- style subhead 14/14
- style head visually
- center boxed text
- kern large type
- check for bad line breaks
- add your name to slug area
- file > adobe PDF presets > press quality (include slug area)
- print centered on 8.5x11 page (include slug area)
Grading
- submit b&w laser proofs with your name on it for grading
- file graded proofs in your 3-ring binder for individual review
- file > export (150PPI, quality=high)
- open JPEG in Photoshop
- crop, file > save for web (preset=jpeg high, image size=800px wide)
- publish final JPEG as a link from your projects page
