Objective
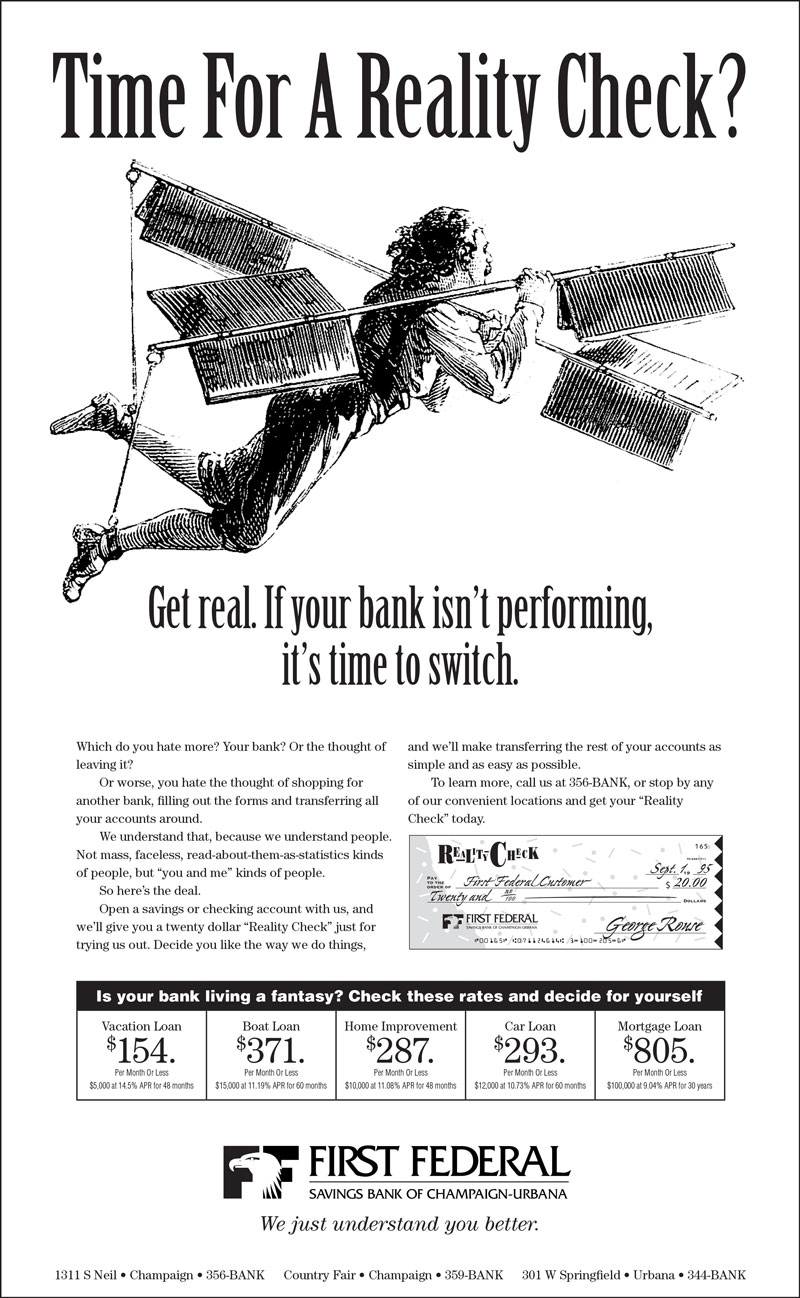
To learn InDesign layout and production techniques by recreating
the ad below.
Procedure
prepping for the exercise
- download starter files
- turn on Birch
- launch InDesign
- file > new: width = 51p9, height = 84p; margins=0; bottom
slug=3p (more options); save preset "news gazette 4x14"
- practice Adobe navigation keyboard shortcuts: space=hand; space+cmd=zoom
in; space+cmd+opt=zoom out; cmd+zero=fit in window
- practice InDesign preview shortcuts: cmd+opt+I (show/hide hidden
characters); W (normal/preview mode)
- rename "layer 1" "pix"
- new layer "type"
- file > place all assets (cmd+D) on appropriate layers
laying out the ad
- replace two spaces with one space (cmd+F)
- relace two ¶ with one ¶ (^p=RETURN)
- window > paragraph styles: normal=10/14 ITC Century Std Book;
hyphenation=off; justification=single line composer
- split up text into logical frames
- make head and subhead Birch, size visually
- indent body copy with a tab (except first paragraph); make
tab 1p6
- object > text frame options: columns=2
- add forced column break (ENTER)
- tagline text is 18pt (italic)
laying out the chart
- draw new text frame (same width as body copy)
- table > insert table (2 rows, 5 columns)
- select first row: table > merge cells
- cut and paste text into table cells, center (cmd+shift+C)
- chart info numbers is 28/25, kerning=optical (new paragraph style "numbers")
- use superscript
for "$" (must be done after creating paragraph style)
- small text is 6/8 Helvetica Light Condensed (new paragraph style "small")
- boxed text head is Helvetica Black, center (cmd+shift+C), size visually (cmd+< or cmd+>), fill=white
- select first row: table > cell options > strokes & fills: bg=black
- select all cells: table > cell options > text: vertical justification: centered
- adjust table row height visually
finishing the ad
- add drop shadow to check art (object > drop shadow)
- add frame with 1pt border on new layer (snap to edge of ad)
- window > strokes: align stroke=inside (adjust box dimensions)
- unlock all layers, select all (cmd+A)
- group text and check art (cmd+G)
- window > align: horizontal align center (to page)
- adjust layout until it matches the reference file
- file > Adobe PDF presets > high quality (for laser prints)
grading
- add slug at bottom with your name and exercise number
- print a proof for grading (centered on tabloid paper with slug)
- file graded proof in your Process Book for individual review
