Objective
To learn the rules, traditions and
conventions of typesetting editorial text. To be introduced issues
involving layout and publication design. To be introduced to InDesign's
professional typesetting tools by laying out the following editorial
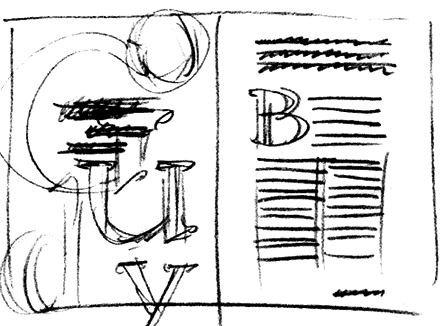
spread:
Procedure
prepping for the exercise
- download starter files
- inspect downloaded files
- launch InDesign
- file > new: w=8.25in, h=10.75in, portrait, facing pages; margins=0; bleed=1p; bottom slug=2p
- practice Adobe navigation keyboard shortcuts: space=hand; space+cmd=zoom
in; space+cmd+opt=zoom out; cmd+zero=fit in window
- practice InDesign preview shortcuts: cmd+opt+I (show/hide hidden
characters); W (normal/preview mode)
- help: keyboard shortcuts: keys for working with type
- window > pages:
numbering & section options (flyout menu): start page number at: 2
- add new page
- rename "layer 1" "text"
laying out the right-hand page
- file > place "goudy.doc" (cmd+D)
- find all occurances of two RETURNS and replace with one RETURN
(replace ^p^p with ^p); replace two
spaces with one space
- window >
character: 10/12 Goudy Old Style; hyphenation=yes
- split text into logical frames
- rough out right page
- main text frame: justified, indent first line 1p6 (except line 1)
- object > text frame options: columns: 2, even out columns
- first paragraph frame:
14/22, justified full
- lead-in:
11/24, justified, all caps, tracking=??
- folio:
7pt Gill Sans, all caps, align right
- adjust layout until it matches the reference file
- add decorative bullets (window > glyphs)
laying out the left-hand page
- add 2 new layers: "bg", "art"; restack
(tip: lock layers you are not working on)
- copy "Goudy" into new text frame on "art" layer
- split each letter of "Goudy" into individual text frames
- select tool: type > create outlines
- scale, position, add color, restack (object > arrange...)
- window > effects: adjust transparency, play with modes
- add background color, adjust color of type objects
- mask art for the left hand page: select all art, group; cut
and paste into new graphic picture frame (edit > paste into)
- add your name and exercise number in slug area
- print as a spread with bleeds and crops on 12x18 paper
grading
- submit color laser proof with your name
on it for grading
- file your graded proof in your Process Book for individual review
