Objective
To create a custom-sized book spread. To place, resize, and crop graphics. To import and set type. To draw rules and use as design elements. To learn layout techniques.
Download the starter file and unzip: Mabry.zip
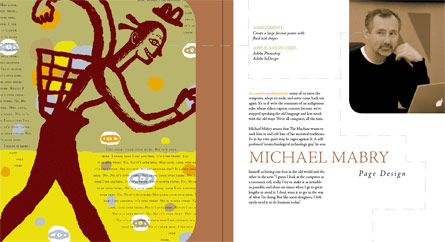
We will be creating this spread:
Procedure
- open InDesign; open a New Document (command-N)
- 2 facing pages; page size: 51p0 x 55p6; 1 column; margins: top: 6p0; bottom: 4p6; inside: 6p0; outside: 4p6
- more options: bleed 0p9 all around; save as yourname-X3.indd; continue to save after each step below
- in the pages palette, double-click on the little triangle above page 1 to open the Numbering and Sections dialogue box; start on page 2 (note that even-numbered pages are always on the left, and odd-numbered pages are always on the right)
- place Mabry fig35.tif on the left-hand (verso) page; snap the image to the upper left bleed guides; select the lower right handle and drag it to fill the page; use the white arrow to select the image; holding down the shift key, drag the handle on the right side to fill the page; shift-drag the left handle until the image looks like above (approx. 260%); use the hand to move the around within its bounding box
- with the black arrow, drag the zero point to the top center of the two pages; drag a guide to 2p6; place the file brown curve mask.eps; under View, select Display Performance High Quality; center the brown curve vertically and align the left edge with the page margin guide; crop the graphic by dragging the top and bottom handles until they snap to the bleed guides and the right handle until it snaps to the guide at 2p6
- place the text file Mabry.doc on the pasteboard; select all and set type as 11/14 Adobe Jenson Pro Light; drag a horizontal guide to 21p0 and a vertical guide to 24p0; select the last two paragraphs of text, cut, and paste into a box within the guides you just drew
- cut the "Assignment" and "Applications used" text and paste it into a box starting from the upper left corner and 12 picas wide; lengthen the text box if necessary; set this type as 12/14 Adobe Jenson Pro Italic
- create some color swatches: brown 0/43/61/34; green 30/21/70/0; orange 8/36/100/0; blue 27/17/13/0
- select "Assignment:" and make it regular, all caps, and green; same for "Application used."
- triple-click to select "Michael Mabry" and set it as 46/48 Regular all caps and color it brown; while selected, cut and paste into a new text box about 34 x 4 picas; drag this box to align with the left margin and about 34p6 down from the top of the page (look at your left ruler as you move it, or drag a guide)
- while still selected, find the Text Wrap palette and click on the second icon; add a top wrap of 1p0
- select "Page Design" and set it as 22/24 Italic with tracking of 150; reduce the size of the text box; move the box to 32 picas from the left and 39 picas down (draw guides or look at the rulers)
- select "As creative professionals," and make it bold and orange (first phrase of first paragraph)
- draw a box 26 x 29 picas; add rounded corners of 3p0 (Objects > Corner Effects); while box is selected, place Mabry duotone.tif with Replace Selected Item checked; size and position the photo like you did with the other image; with the black arrow, place the whole box so that it aligns at 44p6 picas on the left and 9p6 picas on the bottom (the other 3 rounded corners should be completely off the page); press W to check positioning
- select the top text box and move it away from the left margin by 1 pica
- with nothing selected, change fill to none, stoke to blue, 1 pt dashed, 32 pt dash, 21 pt gap; use the pen tool to draw rules to match the sample above
- make final adjustments; print out a copy for your binder; export to pdf (smallest file size, crop and bleed marks) and upload to Angel for grading
