Objective
To learn Adobe Illustrator production techniques by recreating
the art below:
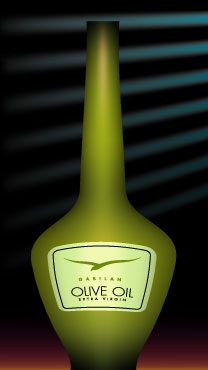
Discussion
The gradient mesh feature which allows
one to make complex blends that remain editable. Mesh objects can
also be used in conjunction with envelope distort to alter the
shapes of objects with more control. In this exercise, we will
make use of both features to recreate the above illustration.
Note: A good habit to get into while working in Illustrator is
to make a copy of your work before going on to the next step. This
gives you the freedom to experiment and compare variations before
deciding on the best approach. The end result is also a reference
file that can be used in the future to create similar effects.
Procedure
preparing for the exercise
- download starter file
- open "mesh.ai" in Illustrator, inspect layers, view > outlines (cmd+Y)
- help > Illustrator help: search "mesh", read "about
meshes"
making the bottle with gradient mesh
- draw box (hint: always copy object before the next step)
- object > create gradient mesh (6 rows x 4 columns)
- direct select tool: adjust rows
- change fill color to olive (eyedropper reference color)
- direct select top/bottom rows
- add black (window > color)
- repeat with outer columns
- direct select 4 mesh points (one grid line in from corner)
- add black (window > color)
- adjust highlights: edit > edit colors > recolor artwork
(adjust saturation/brightness)
- select top 4 rows, resize narrower (scale tool)
distorting the bottle with envelope distort
- copy original box art
- object > create gradient mesh (2 rows x 2 columns)
- move horizontal mesh line down
- object > arrange > bring to front (cmd+shift+])
- copy bottle art; select top object and bottle
- object > envelope distort > make with top object
- direct select tool: adjust handles
- object > expand
making the label
- copy bottle art
- object > flatten transparency (preserve alpha transparency=yes)
- object > clipping mask > release; ungroup (cmd+shift+G)
- delete outer box, fill label area with black
- draw objects for cutting
- window > pathfinder: subtract; expand
- object > create gradient mesh (3 rows x 2 columns)
- mesh tool: add vertical mesh lines (use progressive rhythm)
- object > arrange > bring to front (cmd+shift+])
- copy label art; select top object and label
- object > envelope distort > make with top object
- object > expand
making the background
- copy bottle and label art, adjust position
- draw box for background, fill=100K+100C
- object > create gradient mesh (24 rows x 1 columns)
- select every 3rd mesh point on right, make 0K+100C
- make each blue mesh point progressively darker: add 10%K
- scale tool: adjust position of mesh points; adjust handles
- use swatches to colorize last 2 mesh rows
- copy bottle and label art, position over background
- save
grading
- select finished art, copy and paste into new art board (letter, portrait);
make larger
- file > save as (format=PDF)
- add your name and the exercise number to the file
- print a proof for grading (just page 2)
- file your graded proof in your Process Book for individual review
