Objective
To learn advanced Illustrator production techniques. To learn Illustrator's
isometric projection system by recreating the above art.
Discussion
Isometeric projections are usually used for diagrams or maps to represent three-dimensional space. Although isometric systems look three-dimensional, they are not in true perspective as there is no vanishing point. This is not usually a problem for single objects, but large scale illustrations created using this system will look "wrong" since objects do not appear smaller as they move away from the viewer.
Procedure
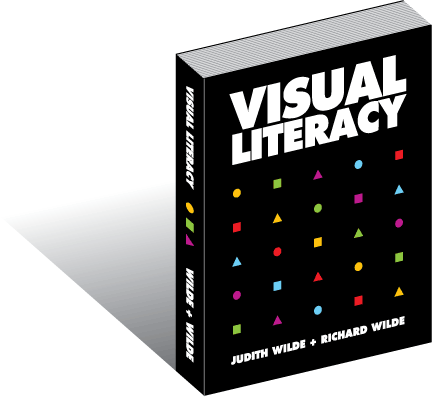
creating the book cover
- launch Illustrator, file > new (cmyk), save as "book.ai"
- practice Illustrator's navigation shortcuts (download
Illustrator keyboard shortcuts)
- rename "layer 1" as "box"
- draw box 8x10 inches; fill=black, stroke=none
- new layer "type"
- add type per sample above (font=Futura Extra Bold)
- scale, track and kern type (cmd+shift+< or > to scale; option+left/right arrow to track/kern; opt+up/down arrow for leading)
- new layer "symbols"
- draw circle, square, triangle (star tool: up/down arrow to change points, SHIFT to constrain)
- duplicate and distribute: make one row of 9 objects
- position 5 objects on book cover
- duplicate rows 4x (total of 5 rows), shift vertical alignment of objects
- delete unneeded symbols, re-distribute and align
- adjust size and position of all objects
- add colors
creating the spine
- box layer: draw box 1x10 inches; fill=black, stroke=none
- duplicate cover type/art for spine
creating the top
- box layer: draw box 8x1 inches; fill=black, stroke=none
- new layer "top"
- draw box 8in x 2pt (fill=40K)
- duplicate by moving -4pt (double-click select tool)
- object > transform > transform again: total of 18 objects (cmd+D)
- snap to top of reference box
creating the shadow
- box layer: draw box 8x8 inches
- draw gradient for shadow (top=0K, bottom=50K)
- save; save as "book2.ai"
- type > create outlines
creating isometric art
- group cover, repeat with spine, top
- select all objects: scale h=100%, v=86.6% (double-click scale tool)
-
shear & rotate as follows (select object, then double-click each tool):
| |
shear |
rotate |
| front (cover) |
+30° |
+30° |
| side (spine) |
-30° |
-30° |
| top/shadow |
-30° |
+30° |
- view > smart guides=on
- direct select tool: option-click to select grouped object, select anchor point, snap objects together
- adjust length of shadow
- adjust size, proportion, shear of final book
- add vertical line for fold (stroke=2pt, 60K)
grading
- submit b&w laser proofs with your
name on it for grading
- file graded proof in your Process Book for individual review
- publish a JPEG linked from your Process Page (no wider than 800px)
