Objective
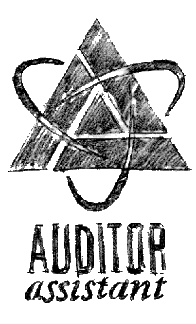
To learn Illustrator drawing techniques by recreating the
logo below.
Discussion
The best way to create a logo is by sketching out concepts. The best way to execute a logo is to trace over the sketch in Illustrator. During the tracing process, a lot of interpretation is required. Often, a logo becomes better as a result of interpretation.
By definition, a logo must work in b&w. Therefore all logos are first created without color and approved by the client before color is added. When applying color, Pantone colors are preferred since it has a wider color gamut than CMYK. Pantone chips can also be matched with paint and dyes for signage, fabrics and other applications. In addition, apps can easily convert Pantone to CYMK, but CYMK can't automatically be converted to Pantone.
Also see Illustrator's HELP menu: color: working with color groups.
Procedure
preparing the file
- download above sketch (RMB: save image as...)
- launch Illustrator, file > new (document profile=print)
- file > save as "auditor-master.ai"
- file > place "auditor-sketch.gif" (as template)
- rename "layer 1" as "guides"
- draw triangle: polygon tool, arrow down, shift; adjust size
- view > outlines (cmd+Y)
- draw horizontal box representing the gutter space
- select triangle and box, rotate 120 degrees, copy, align triangles
- repeat
- select all, view > make guides
drawing the logo
- new layer "art"
- fill=black, stroke=none
- draw logo using the pen tool by clicking on guide points
- object > compound path > make
- new layer "curves": draw one curve; adjust thickness
- duplicate curve and offset for shadow, make fill=white
- object > arrange > send backward
- draw square aligned to triangle for reference
- select curves and square, rotate 120 degrees, copy, align
- repeat
- use pathfinder to cut white art out of triangles
- new layer "type"
- create type (Helvetica LT Std Ultra Compressed & Garamond Semibold Italic)
- convert type to outlines, delete dot of "i" (cmd+shift+O, cmd+shift+G)
- save; save as "auditor-BW.pdf"
- window > swatches: select all unused, delete
- save, save as "auditor-color-test.ai"
coloring the logo (manually)
- window > swatch libraries > color books > Pantone solid coated
- choose one base color
- window > color guide (filter: color books > Pantone solid coated)
- choose a harmony rule: add more colors (up to 3 total)
- duplicate art, repeat (manually adjust colors as needed)
- save your favorite color groups to swatches
re-coloring the logo (automatically)
- duplicate art
- window > color guide: recolor artwork (flyout > edit colors)
- adjust hue: rotate colors on wheel
- adjust brightness: show saturation/hue
- adjust saturation: show brightness/hue
- duplicate art, repeat
- save your favorite color groups to swatches
finalizing the logo
- copy and paste your best color solution into new file "auditor-PMS.pdf"
- draw boxes: label your colors
- window > swatches: select all unused, delete
- save, save as "auditor-CMYK.pdf"
- window > swatches: convert to CMYK (double-click swatch)
- change labels to CMYK formulas
- save, save as "auditor-RGB.pdf"
- file > color mode > RGB
- window > swatches: convert to RGB (double-click swatch)
- change labels to HEX codes; save
- delete labels
- file > save for web (preset=PNG 24, image size=1000px wide, clip to artboard=no)
- close window without saving
grading
- submit b&w laser proofs of all files with your name and the exercise number on it for grading
- file your graded proof in your Process Book for individual review
