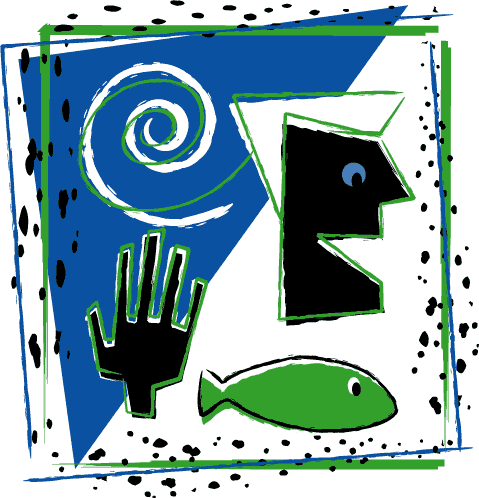
Objective
To learn advanced Illustrator drawing techniques. To learn Illustrator's
art brushes and styles by recreating the following illustration
by artist Ellen Papciak-Rose:
Discussion
Another way to "roughen up" art work is by applying art brushes
to strokes. In this case, we achieved the scratch board-style
edges by applying
vector "art brishes" to strokes. One feature of Illustrator is the ability
to apply mutiple strokes to one object. Another feature is the
use of "styles" to affect the look of multiple objects. In this
exercise, we will make use of both of these features.
Procedure
prepping illustrator
- Download starter files
- launch Illustrator, file > new (cmyk), save as "scratch.ai"
- file place "scratch.gif" (place as template)
- practice Illustrator's navigation shortcuts (download
Illustrator keyboard shortcuts)
creating the art in illustrator
- set stroke to black and fill to none, stroke weight=1pt
- draw the art (cmd-click to deselect before drawing new objects)
- direct select tool: make adjustments (if necessary)
- hide template layer
- window > show brushes: examine, view by name, select all
unused, delete
- open downloaded file "art brushes", select all,
copy and paste into "scratch" window, move aside (note:
window > brush libraries has other brushes as well)
adding brushes to borders
- window > brushes
- select "scratch 1" art, make new art brush; colorization=tint
- repeat with other brush art; delete brush art from art board
- select bottom line
- apply "scratch 2" brush (note
appearance)
- add "random 1" brush by duplicating "scratch
2" (in appearance),
- add "splatter 2" brush by duplicating "random 1" (in appearance),
- apply stroke colors:
• scratch 2=green
• random 1=black
• splatter 2=blue
- window > stroke: change stroke weight:
• random 1=3 pt
• splatter 2=.5 pt
- select "splatter 2" (in appearance)
- effects > distort & transform > transform: preview=yes;
scale horizontal=115; move horizontal=-10; rotate angle=3
adding styles
- window > graphic styles: select all unused, delete
- select bottom line
- new style "scratch border"
- select other borders and apply "scratch border"
style
- select upper left border, fill=blue
- select fill (in appearance)
- effects > distort & transform > transform: preview=yes;
rotate angle=8
- select "scratch 2" stroke (in appearance)
- effects > distort & transform > transform: preview=yes;
move horizontal=?
- adjust stacking order (in appearance)
adding brushes to hand
- select hand, apply "punk 2" brush (note appearance),
fill=black, stroke=white, stroke weight=1.5 pt
- duplicate "punk 2" stroke (in appearance), apply
"splatter 2" brush, stroke=green, stroke weight=.5 pt
- effects > distort & transform > transform: preview=yes;
move vertical=5; rotate angle=357
- new style "hand"; apply to fish and head
- select fish, select green stroke (in appearance), stroke=black, fill=green
- select hair, fill=white
- choose default style, draw eyes
adding brushes to spiral
- select spiral, apply "splatter 1" brush (note appearance),
stroke=white, stroke weight=.5 pt
- duplicate "splatter 1 " stroke (in appearance),
apply "splatter 2" brush, stroke=green
- effects > distort & transform > transform: preview=yes;
scale horizontal= 110, vertical=85; rotate angle=30
- save
grading
- file > save as (format=PDF)
- delete unused art
- object > expand appearance
- add your name and the exercise number to the file
- print a proof for grading
- file your graded proof in your Process Book for individual review
